Flow model setup
Use flow model setup to calculate or import a wind flow model.
Flow model type options:
There are multiple ways in WindFarmer: Analyst to define the wind flow model to extrapolate wind climate predictions across the site. Choosing your flow model type is the first step in flow setup.
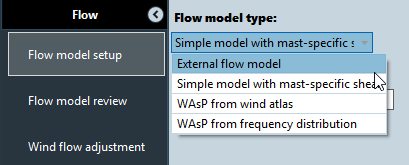
| WAsP from frequency distribution | Flow calculation | Automate WAsP, initiating the model using measurements at all Measurement Sites (wind speed and direction frequency distributions '.tab' files). |
| WAsP from wind atlas | Flow calculation | Automate WAsP, using a Wind atlas (LIB file) for the whole site |
| Simple flow model with mast specific shear | Flow calculation | For quick, indicative studies. Can also be used to quickly generate a uniform wind flow field suitable for some offshore sites. |
| External flow model | Imported flow | Import '.wrg' and/or '.rsf' at target locations. These may be imported with wind resource data at measurement site locations to associate them with measurement sites, or alternatively without, if there are no on-site measurements available.
The flow calculation settings are irrelevant to imported flow models. |
Detailed information about each flow model type are discussed further below.
Flow Calculations
You can run a flow calculation before you place any turbines by defining flow model boundaries and heights. This allows you to design your layout with reference to a mean wind speed grid layer.
For gridded flow calculations you must define where you wish to calculate the grid using a flow field boundary. Set the grid resolution in meters in the table.
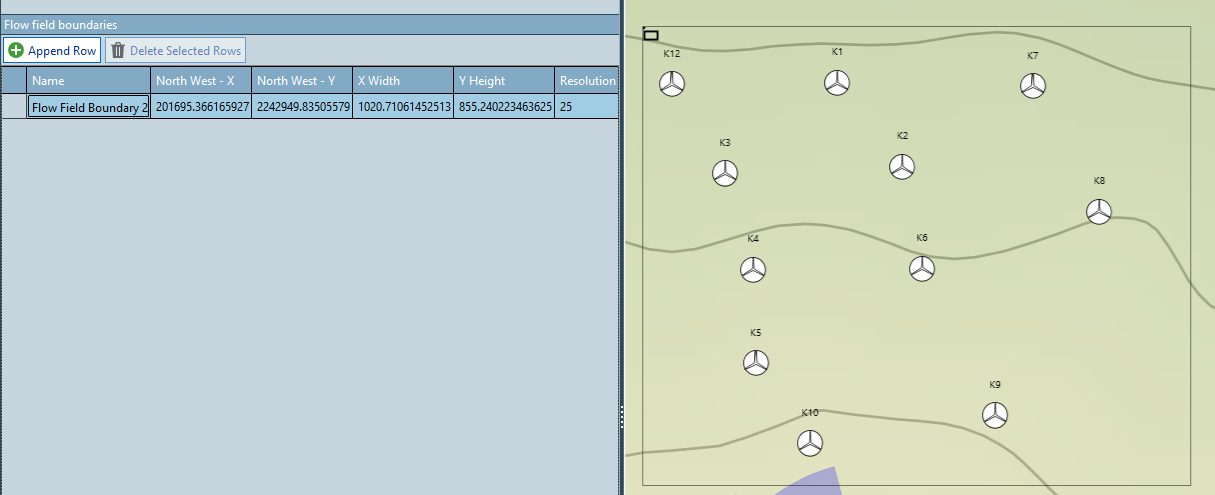
You then define target heights: enter the turbine hub heights you wish to analyse for your project.
You may then run the flow calculation.

A separate prediction at each height is made for each measurement site with some available wind climate data. This means you can make changes to your initiation strategy without re-running the wind flow calculation in the initiations task.
After running the calculation you can review the structure of the calculated data in the Flow Model Review task.
Note
Discrete wind flow predictions will be made at any turbine locations in any Scenario not covered by the flow field grids you define. If you define no flow field boundaries WindFarmer: Analyst will only make discrete predictions.
Tip
Entering any known (e.g. neighbouring or installed) turbine locations before running the wind flow can save computation time and memory because you only need to calculate flow grids to cover your buildable area.
Warning
If you have more measurement sites than you wish to use for creating flow predictions you may unintentially increase the duration of wind flow calculations and size of results. You can reduce the number of predictions made by de-activating frequency distributions on undesired measurement sites in Wind > Calculate Wind Climate.
Note
When calculating flow field grids, displacement heights are not considered
WAsP Flow Calculations
WindFarmer: Analyst can automate WAsP directly. There are 2 types of WAsP calculation supported within WindFarmer.
See installation for supported WAsP versions.
All WAsP calculations require the following input data:
| Input required | Chapter > Task |
|---|---|
| Active frequency distribution on measurement site | Wind > Calculate Wind Climate |
| Vector elevations | Map > Elevations |
| Roughness map | Map > Roughness |
WAsP from frequency distribution
This flow model type option allows you to make WAsP wind flow predictions using a measured wind speed and direction Frequency Distributions (e.g. a .TAB files) activated in Calculate Wind Climate.
WAsP from wind atlas
This flow model type option allows you to make WAsP wind flow predictions from a wind atlas (.LIB file) that represents geostrophic wind at a height where local roughness and terrain are not important. The same LIB file will be used to for all wind flow calculations in the workbook.
As a further input you must import a wind atlas file.
Important
We still require that you have at least one Measurement Site to run a WAsP from wind Atlas calculation. We use it to hold results and provide a reference location. Its location does not matter.
Advanced WAsP settings
Clicking advanced brings up the WAsP parameters.

The offset and RMS heat flux parameters define the influence of the atmospheric stability on the vertical wind shear. The default settings are for slightly stable conditions and are consistent with WAsP 10.1 and higher. Users should refer to the WAsP documentation for an explanation of these parameters.
Simple flow model
The Simple wind flow model has been included to enable wind flow model calculations to be performed quickly and cheaply, without the need for external software. As the name suggests, it uses a simple algorithm which can produce results with a level of accuracy appropriate for use in early feasibility studies. It is also useful for offshore or flat sites where it is an acceptable approximation to have no ambient wind speed variation across the site.
The simple flow model calculation is discussed further in the calculation reference.
| Input required | Chapter > Task | Description |
|---|---|---|
| Topographic sensitivity | Flow > Flow Model Setup | This single setting defines how the wind speed responds to changes in elevation. |
| Mast specific shear | Wind > Shear Model | The Simple flow model will calculate the change in wind speed between the height above ground level at which the wind was measured, and the hub height. This is performed using the wind shear model. The simple flow model currently only works with the User Defined Shear Model Type. |
| Gridded elevations | Map > Elevations | Gridded elevations are required for this model. If you have vector contours go back to Elevations and convert them to a grid. |
| Active frequency distribution | Wind > Calculate Wind Climate | At least one frequency distribution associated with a Measurement Site is required. |
Calculating a uniform wind resource
Sometimes you may wish to use the same prediction of wind climate everywhere. This may be done with the simple flow model by setting the topographic sensitivity to zero.
External flow model
The external flow model option allows you to import an external flow model defined using the .RSF (discrete points) or .WRG (gridded) data format.
The WindFarmer: Analyst external flow model import has two options, designed to work with and without the Association Method.
To work with the Association Method, we require that you associate the target location wind resource predictions with a Measurement Site. To do this WindFarmer: Analyst requires a similar wind resource prediction at the reference measurement site location. In most cases this should be the measurement site which provided the measurement data you used to initiate your wind flow calculation in your external flow modelling software. This approach allows WindFarmer to calculate the directional speedups by comparing reference and target location WRG predictions of wind climate thus removing any Weibull fitting errors from the subsequent analysis.
If no site measurement data is available, the flow model may be imported as a simple list. A flow reference point will be created at the centre of each resource file but it is not currently recommended to use this in any calcuations. A flow model set up in this way works best with the association method turned off, so that the Weibull data is used directly.
External flow model import process - with no measurement mast data
In Flow model setup choose the flow mode type External flow model and click Import External Flow Model **without* Measurement Site*

Import the flow data into the table

When you have selected all the data, click on Update Wind Resources. All previously loaded/calculated flow models will be replaced with the new data.
Review the imported flow data by clicking the flow model review task. Each loaded wind resource will be seen attached to a flow reference point, and also in a table. From here it may also be easily deleted.
Note
The initiations task is not relevent and can be skipped for this workflow.
External flow model import process - with measurement mast data
The general external flow model import process is as follows:
In Flow model setup choose the flow mode type External flow model and click Import External Flow Model **with* Measurement Site*

Import the flow data into both tables:
- Reference measurement site location point wind resources: *.WRG (Wind resource grid)* This point WRG must be at the location of a measurement site and at the height of an active frequency distribution on that measurement site. The file only contains one location. After import the flow model point data are automatically assigned to the corresponding measurement site in the workbook when matching locations are found. In general, you can have multiple WRG files at different heights for the same measurement site.
- Turbine target location wind resources: .WRG (Wind resource grid) or .RSF (point predictions) Import the discrete RSF data for the turbine locations. Each target location WRG or RSF file may only contain data at one height.
For every Turbine target location wind resource file imported select the relevant Reference Location (Point .wrg); these should be from the measurement site corresponding to the data used to initiate your external flow model.
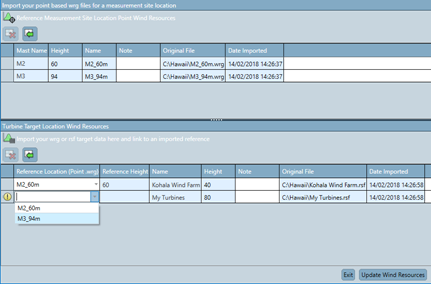
When you have assigned all the data, click on Update Wind Resources.
If you have imported gridded data you can see the mean wind speed predicted given the default initiation strategy (closest mast) on the map. Look at the wind climate layer in the legend to adjust the colour scheme settings.
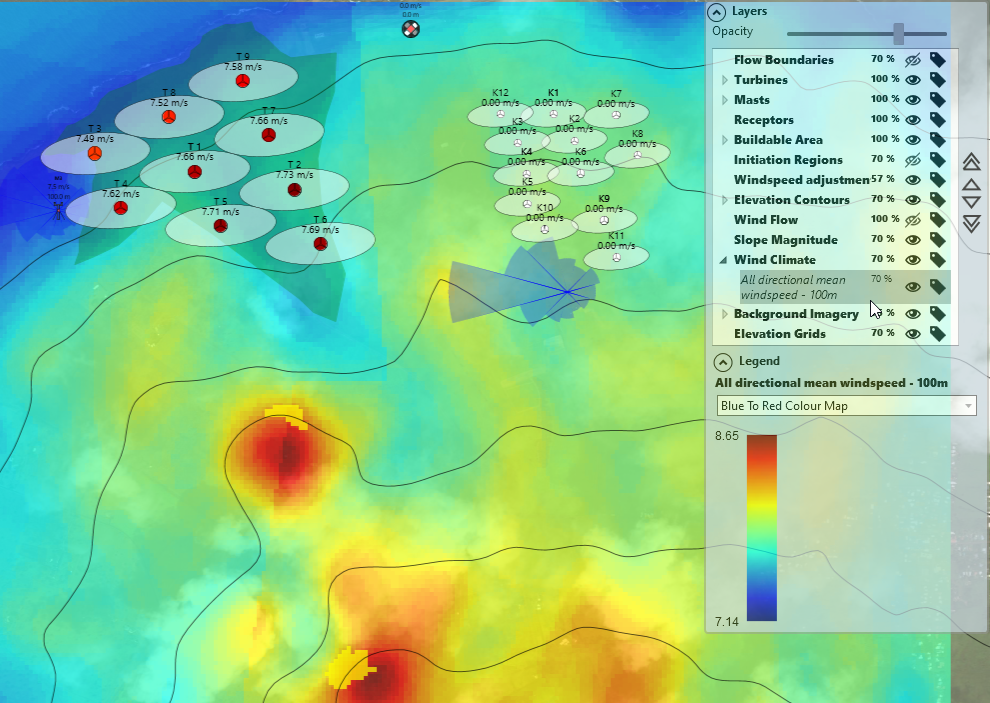
If you imported discrete predictions that were selective in which turbine locations were covered by RSF points in each file click Auto-Generate inititiation regions to deduce the initiation strategy from the imported data. (otherwise you are likely to see some turbines have zero wind speed predictions)
Review the assignment of the imported flow data to measurement sites and association with measured frequency distributions by clicking the flow model review task.
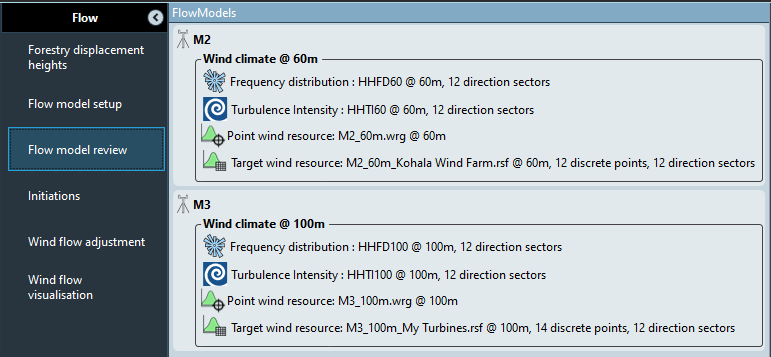
If you want to apply a more specific initiation strategy you can use initiation regions to carve up the site in to sensible areas. The initiation region concept allows turbines to be moved in optimisations and be associated with the most representative wind climate measurements for the new locations.
Creating point WRG files
To create point WRG files at measurement site wind climate locations you could either:
- Extract a point WRG file from one line in the wind resource grid nearest the measurement site location (if the wind climate is within the grid).
- Calculate the point wind resource grids in an external flow modelling software, like WAsP. If your flow modelling software takes a tab file as an input you could make a 'self-prediction' at the tab file loction and export a single-location WRG file.
Importable flow file formats
| Extension | Input file type | Description |
|---|---|---|
| .WRG | WAsP Wind resource grid | The WRG file is a wind resource grid file as output by WAsP or other compatible wind flow software. WRG files contain numerous fields of data for each point in the grid, including the x, y and z coordinates of each point (m), its power density (W/m2), overall Weibull A and k parameters and Weibull A and k parameters for each of the direction sectors, along with P, the probability of occurrence, for each of these sectors. These sector-wise data describe a wind rose and windspeed distribution at each point of the grid. |
| .RSF | WAsP wind farm resource | The RSF is analogous to the wind resource grid but it is for exact discrete locations, not grids, so is suitable when you know the turbine layout. |
Using a blended CFD WRG
If you have a CFD WRG grid fit to data from multiple measurement sites, to use this in WindFarmer: Analyst also using the association method to utilise the measured data in the energy modelling you must import the blended CFD wind resource grid (.WRG) once per point WRG imported.